In this article I want to describe how to check Internet Connection using .Net.
We use an API function to check the connection; InternetGetConnectionState.
The function source code is described below:
Private Declare Function InternetGetConnectedState Lib "wininet.dll" (ByRef lpdwFlags As Int32, _
ByVal dwReserved As Int32) As Boolean
Public Function IsConnectionAvailable() As Boolean
Dim lngFlags As Long
Try
'Return True if connection is available
IsConnectionAvailable = InternetGetConnectedState(lngFlags, 0)
Catch ex As Exception
Throw ex
End Try
End Function
Friday, February 17, 2006
Sunday, February 12, 2006
WebDAV for .Net Sample Application
This is a sample to send email using WebDAV protocol:
'define public variables
Private strUsername As String
Private strPassword As String
Private strAddress As String
Private strServer As String
Private strDomain As String
Private strMailboxURI As String
Public Sub SendEmail(ByVal strTo As String, ByVal strSubject As String, ByVal strBody As String)
'Variables.
Dim PUTRequest As System.Net.HttpWebRequest
Dim PUTResponse As System.Net.HttpWebResponse
Dim MOVERequest As System.Net.HttpWebRequest
Dim MOVEResponse As System.Net.HttpWebResponse
Dim strMailboxURI As String
Dim strSubURI As String
Dim strTempURI As String
Dim PUTRequestStream As System.IO.Stream
Dim bytes() As Byte
Try
' Build the mailbox URI.
strMailboxURI = "http://" & strServer & "/exchange/" & strAddress
' Build the submission URI for the message. If Secure
' Sockets Layer (SSL) is set up on the server, use
' "https://" instead of "http://".
strSubURI = strMailboxURI & "/##DavMailSubmissionURI##/"
' Build the temporary URI for the message. If SSL is set
' up on the server, use "https://" instead of "http://".
strTempURI = strMailboxURI & "/drafts/" & strSubject & ".eml"
' Construct the RFC 822 formatted body of the PUT request.
' Note: If the From: header is included here,
' the MOVE method request will return a
' 403 (Forbidden) status. The From address will
' be generated by the Exchange server.
strBody = "To: " & strTo & vbNewLine & _
"Subject: " & strSubject & vbNewLine & _
"Date: " & System.DateTime.Now & _
"X-Mailer: test mailer" & vbNewLine & _
"MIME-Version: 1.0" & vbNewLine & _
"Content-Type: text/plain;" & vbNewLine & _
"Charset = ""iso-8859-1""" & vbNewLine & _
"Content-Transfer-Encoding: 7bit" & vbNewLine & _
vbNewLine & strBody
' Create the PUT HttpWebRequest object.
PUTRequest = CType(System.Net.WebRequest.Create(strTempURI), _
System.Net.HttpWebRequest)
' Create a new CredentialCache object and fill it with the network
' credentials required to access the server.
' Add the network credentials to the request.
Dim myCredential As System.Net.NetworkCredential = New System.Net.NetworkCredential(strUsername, strPassword, strDomain)
PUTRequest.Credentials = myCredential
' Specify the PUT method.
PUTRequest.Method = "PUT"
' Encode the body using UTF-8.
bytes = System.Text.Encoding.UTF8.GetBytes(strBody)
' Set the content header length. This must be
' done before writing data to the request stream.
PUTRequest.ContentLength = bytes.Length
' Get a reference to the request stream.
PUTRequestStream = PUTRequest.GetRequestStream()
' Write the message body to the request stream.
PUTRequestStream.Write(bytes, 0, bytes.Length)
' Close the Stream object to release the connection
' for further use.
PUTRequestStream.Close()
' Set the Content-Type header to the RFC 822 message format.
PUTRequest.ContentType = "message/rfc822"
' PUT the message in the Drafts folder of the
' sender's mailbox.
PUTResponse = CType(PUTRequest.GetResponse(), System.Net.HttpWebResponse)
'Console.WriteLine("Message successfully PUT to " & strTempURI)
' Create the MOVE HttpWebRequest object.
MOVERequest = CType(System.Net.WebRequest.Create(strTempURI), _
System.Net.HttpWebRequest)
' Add the network credentials to the request.
MOVERequest.Credentials = myCredential
' Specify the MOVE method.
MOVERequest.Method = "MOVE"
' Set the Destination header to the
' mail submission URI.
MOVERequest.Headers.Add("Destination", strSubURI)
' Send the message by moving it from the Drafts folder of the
' sender's mailbox to the mail submission URI.
MOVEResponse = CType(MOVERequest.GetResponse(), System.Net.HttpWebResponse)
'Console.WriteLine("Message successfully sent to " & strTo)
' Clean up.
PUTResponse.Close()
MOVEResponse.Close()
Catch ex As Exception
Console.WriteLine(ex.Message)
End Try
End Sub
'define public variables
Private strUsername As String
Private strPassword As String
Private strAddress As String
Private strServer As String
Private strDomain As String
Private strMailboxURI As String
'Variables.
Dim PUTRequest As System.Net.HttpWebRequest
Dim PUTResponse As System.Net.HttpWebResponse
Dim MOVERequest As System.Net.HttpWebRequest
Dim MOVEResponse As System.Net.HttpWebResponse
Dim strMailboxURI As String
Dim strSubURI As String
Dim strTempURI As String
Dim PUTRequestStream As System.IO.Stream
Dim bytes() As Byte
Try
' Build the mailbox URI.
strMailboxURI = "http://" & strServer & "/exchange/" & strAddress
' Build the submission URI for the message. If Secure
' Sockets Layer (SSL) is set up on the server, use
' "https://" instead of "http://".
strSubURI = strMailboxURI & "/##DavMailSubmissionURI##/"
' Build the temporary URI for the message. If SSL is set
' up on the server, use "https://" instead of "http://".
strTempURI = strMailboxURI & "/drafts/" & strSubject & ".eml"
' Construct the RFC 822 formatted body of the PUT request.
' Note: If the From: header is included here,
' the MOVE method request will return a
' 403 (Forbidden) status. The From address will
' be generated by the Exchange server.
strBody = "To: " & strTo & vbNewLine & _
"Subject: " & strSubject & vbNewLine & _
"Date: " & System.DateTime.Now & _
"X-Mailer: test mailer" & vbNewLine & _
"MIME-Version: 1.0" & vbNewLine & _
"Content-Type: text/plain;" & vbNewLine & _
"Charset = ""iso-8859-1""" & vbNewLine & _
"Content-Transfer-Encoding: 7bit" & vbNewLine & _
vbNewLine & strBody
' Create the PUT HttpWebRequest object.
PUTRequest = CType(System.Net.WebRequest.Create(strTempURI), _
System.Net.HttpWebRequest)
' Create a new CredentialCache object and fill it with the network
' credentials required to access the server.
' Add the network credentials to the request.
Dim myCredential As System.Net.NetworkCredential = New System.Net.NetworkCredential(strUsername, strPassword, strDomain)
PUTRequest.Credentials = myCredential
' Specify the PUT method.
PUTRequest.Method = "PUT"
' Encode the body using UTF-8.
bytes = System.Text.Encoding.UTF8.GetBytes(strBody)
' Set the content header length. This must be
' done before writing data to the request stream.
PUTRequest.ContentLength = bytes.Length
' Get a reference to the request stream.
PUTRequestStream = PUTRequest.GetRequestStream()
' Write the message body to the request stream.
PUTRequestStream.Write(bytes, 0, bytes.Length)
' Close the Stream object to release the connection
' for further use.
PUTRequestStream.Close()
' Set the Content-Type header to the RFC 822 message format.
PUTRequest.ContentType = "message/rfc822"
' PUT the message in the Drafts folder of the
' sender's mailbox.
PUTResponse = CType(PUTRequest.GetResponse(), System.Net.HttpWebResponse)
'Console.WriteLine("Message successfully PUT to " & strTempURI)
' Create the MOVE HttpWebRequest object.
MOVERequest = CType(System.Net.WebRequest.Create(strTempURI), _
System.Net.HttpWebRequest)
' Add the network credentials to the request.
MOVERequest.Credentials = myCredential
' Specify the MOVE method.
MOVERequest.Method = "MOVE"
' Set the Destination header to the
' mail submission URI.
MOVERequest.Headers.Add("Destination", strSubURI)
' Send the message by moving it from the Drafts folder of the
' sender's mailbox to the mail submission URI.
MOVEResponse = CType(MOVERequest.GetResponse(), System.Net.HttpWebResponse)
'Console.WriteLine("Message successfully sent to " & strTo)
' Clean up.
PUTResponse.Close()
MOVEResponse.Close()
Catch ex As Exception
Console.WriteLine(ex.Message)
End Try
End Sub
Saturday, February 11, 2006
Sending Email in .Net using WebDAV
Items in the Exchange store can be accessed remotely by using the WebDAV protocol, defined in RFC 2518. This protocol extends the HTTP 1.1 protocol, defined by RFC 2616, to provide additional methods and capabilities. It provides a means to access both the contents of an item and an extensible set of associated properties. Some of the methods defined by the protocol are the MOVE Method, the COPY Method, the DELETE Method, and the MKCOL Method. The encoding format used to transfer item properties across the network is XML, defined in the World Wide Web Consortium (W3C) Recommendation REC-xml-20001006.
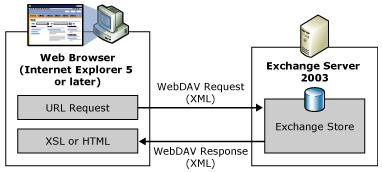
When a URL in the Exchange store is entered in a Web browser, an XML formatted WebDAV protocol request is created and sent to the Microsoft® Exchange Server computer. When the server receives the request, it verifies the credentials of the client and automatically parses the XML for the requested data. The server then builds an XML WebDAV protocol response containing the appropriate properties and their values and sends the response back to the client. If the Web browser is able to parse XML, an XSL style sheet can be applied to the XML response and the data will be displayed in the browser. If the Web browser cannot parse XML, the information is displayed in HTML.
The following illustration shows how a client browser interacts with the Exchange store using WebDAV.

Microsoft Internet Explorer 5 and later provide the Microsoft XML (MSXML) Component Object Model (COM) component, a powerful XML parser and set of related tools. The XMLHTTPRequest COM class integrates with MSXML COM objects to simplify the management of client-side HTTP protocol requests and responses that contain XML bodies.
The transformational capabilities of the MSXML component can easily cast the response XML data into HTML, which can then be displayed by the browser.
When a URL in the Exchange store is entered in a Web browser, an XML formatted WebDAV protocol request is created and sent to the Microsoft® Exchange Server computer. When the server receives the request, it verifies the credentials of the client and automatically parses the XML for the requested data. The server then builds an XML WebDAV protocol response containing the appropriate properties and their values and sends the response back to the client. If the Web browser is able to parse XML, an XSL style sheet can be applied to the XML response and the data will be displayed in the browser. If the Web browser cannot parse XML, the information is displayed in HTML.
The following illustration shows how a client browser interacts with the Exchange store using WebDAV.
Microsoft Internet Explorer 5 and later provide the Microsoft XML (MSXML) Component Object Model (COM) component, a powerful XML parser and set of related tools. The XMLHTTPRequest COM class integrates with MSXML COM objects to simplify the management of client-side HTTP protocol requests and responses that contain XML bodies.
The transformational capabilities of the MSXML component can easily cast the response XML data into HTML, which can then be displayed by the browser.
Friday, February 10, 2006
CDO.Net Sample Application
This is a sample for Sending Email using CDO.Net. Don't forget to add the reference to Microsoft CDO for Exchange Library.
'set constants
Public Const cdoLow = 0
Public Const cdoNormal = 1
Public Const cdoHigh = 2
Public Const cdoSendUsingPort = 2
Public Const cdoSendUsingExchange = 3
Public Const cdoImportance = "urn:schemas:httpmail:importance"
Public Const cdoSendUsingMethod = _
"http://schemas.microsoft.com/cdo/ configuration/sendusing"
Public Const cdoSMTPServer = _
"http://schemas.microsoft.com/cdo/ configuration/smtpserver"
Public Const cdoSMTPServerPort = _
"http://schemas.microsoft.com/cdo/ configuration/smtpserverport"
Public Const cdoSMTPConnectionTimeout = _
"http://schemas.microsoft.com/cdo/ configuration/smtpconnectiontimeout"
Public Const cdoSMTPAuthenticate = _
"http://schemas.microsoft.com/cdo/ configuration/smtpauthenticate"
Public Const cdoBasic = 1
Public Const cdoSendUserName = _
"http://schemas.microsoft.com/cdo/ configuration/sendusername"
Public Const cdoSendPassword = _
"http://schemas.microsoft.com/cdo/ configuration/sendpassword"
Dim objConfig As CDO.Configuration
Dim oFields As ADODB.Fields
Dim oField As ADODB.Field
Dim objMessage As CDO.Message
'---------------- SETUP CONNECTION --------------
'Setup configuration to connect to Exchange Server using SMTP
objConfig = New CDO.Configuration
oFields = objConfig.Fields
' Set config fields we care about
oField = oFields(cdoSendUsingMethod)
oField.Value = cdoSendUsingPort
'Change to read web.config SmptServer section
oField = oFields(cdoSMTPServer)
oField.Value = ConfigurationSettings.AppSettings("EmailServer")
'set SMTP port
oField = oFields(cdoSMTPServerPort)
oField.Value = 25
'set connection timeout
oField = oFields(cdoSMTPConnectionTimeout)
oField.Value = ConfigurationSettings.AppSettings("ConnectionTimeOut")
'set smtp autenthication
oField = oFields(cdoSMTPAuthenticate)
oField.Value = cdoBasic
'set username
oField = oFields(cdoSendUserName)
oField.Value = ConfigurationSettings.AppSettings("DomainName") & "\" & strUserId
'set password
oField = oFields(cdoSendPassword)
oField.Value = strPassword
oFields.Update()
'-------------- CREATE CDO Message Object -----------
objMessage = CreateObject("CDO.Message")
objMessage.Configuration = objConfig
'set the sender
objMessage.From = strEmail
'set destination
objMessage.To = strEmailTo
'set carbon copy
objMessage.CC = strEmailCC
'set blank carbon copy
objMessage.BCC = strEmailBCC
'set the subject
objMessage.Subject = strSubject
'set the message body
objMessage.TextBody = strBody
'add attachment
objMessage.AddAttachment(strFilePath)
'set the message importance
objMessage.Fields(cdoImportance).Value = cdoHigh
'save the message
objMessage.Fields.Update()
'send the message
objMessage.Send()
Sending Email in .Net using CDO
Collaboration Data Objects (CDO) is a server-side collaborative component that is used in conjunction with Microsoft® ActiveX® Data Objects (ADO) 2.5 and Active Directory® Service Interfaces (ADSI). You can use CDO to create Web collaboration solutions based on the Exchange store and Microsoft Active Directory® service in Microsoft Windows® server operating systems. Whereas OLE DB, ADO, and ADSI provide the fundamental data access mechanisms to the Exchange store and Active Directory, CDO provides extended collaborative functionality that includes the creation and management of the following:
- Folders and non-folder items
- Messages
- Appointments
- Meeting request messages and responses (accept, accept tentative, decline)
- Contacts
- Mailboxes, recipients, and the Exchange store folder hierarchies and settings
- Exchange store event-driven workflows that manage process-driven application
In Microsoft Exchange Server 2003, CDO is available only on the same computer (or cluster) as Exchange Server 2003 itself. In addition, CDO can access data only in a local Exchange Server 2003 public store or mailbox store. It cannot directly access data residing in different Exchange Server 2003 stores.
Note The CDO for Exchange Management (CDOEXM) component of CDO can be used from remote servers. You can install CDOEXM along with the Exchange Server 2003 Administration tools.
Friday, February 03, 2006
Creating Multiple Page in Web Form using IE Web Control
The Microsoft Internet Explorer WebControls are a collection of ASP.NET server controls that facilitate user interface (UI) authoring. The WebControls provide a single-source authoring solution in ASP.NET that delivers HTML content based on a browser's capabilities.
When authoring with the WebControls elements and objects in ASP.NET Web Forms, pages are generated that render and function correctly in all commonly used browsers, providing widespread reach to a diverse browsing audience. The ASP.NET server controls detect the browser type and automatically take advantage of many of the advanced capabilities in Internet Explorer 5.5 and later versions.
The WebControls include a set of Dynamic HTML (DHTML) behaviors, which are downloaded automatically from ASP.NET Web Forms to Internet Explorer 5.5 and later versions. These behaviors implement custom elements that can also be used independently of ASP.NET.
To create multiple page in a webform you must download the IE Web Controls component:
http://www.asp.net/IEWebControls/Download.aspx?tabindex=0&tabid=1
Run the setup file and build to create the .dll file.
Make sure you have \webctrl_client folder in your wwwroot directory. If don't exist, copy the directory to your wwwroot.
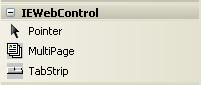 Open your Microsoft Visual Studio and add MultiPage and TabStrip component to the Toolbox after successfull installation. You can also add the .dll to \bin directory in your project.
For Visual Studio 2005 installation you must copy \webctrl_client folder into your project folder to enable the Tab Strip.
Then add some lines in your web.config file (after <configuration>tag):
<configSections>
<section name="MicrosoftWebControls"
type="System.Configuration.NameValueSectionHandler, System, Version=2.0.0.0,
Culture=neutral, PublicKeyToken=B77A5C561934E089"/>
</configSections>
<MicrosoftWebControls> <add key="CommonFiles"
value="/yourwebsitename/webctrl_client/1_0/"/>
</MicrosoftWebControls>
Both component, MultiPage and TabStrip, are only editable from the html view and can not editable from the designer.
When authoring with the WebControls elements and objects in ASP.NET Web Forms, pages are generated that render and function correctly in all commonly used browsers, providing widespread reach to a diverse browsing audience. The ASP.NET server controls detect the browser type and automatically take advantage of many of the advanced capabilities in Internet Explorer 5.5 and later versions.
The WebControls include a set of Dynamic HTML (DHTML) behaviors, which are downloaded automatically from ASP.NET Web Forms to Internet Explorer 5.5 and later versions. These behaviors implement custom elements that can also be used independently of ASP.NET.
To create multiple page in a webform you must download the IE Web Controls component:
http://www.asp.net/IEWebControls/Download.aspx?tabindex=0&tabid=1
Run the setup file and build to create the .dll file.
Make sure you have \webctrl_client folder in your wwwroot directory. If don't exist, copy the directory to your wwwroot.
 Open your Microsoft Visual Studio and add MultiPage and TabStrip component to the Toolbox after successfull installation. You can also add the .dll to \bin directory in your project.
For Visual Studio 2005 installation you must copy \webctrl_client folder into your project folder to enable the Tab Strip.
Then add some lines in your web.config file (after <configuration>
<section name="MicrosoftWebControls"
type="System.Configuration.NameValueSectionHandler, System, Version=2.0.0.0,
Culture=neutral, PublicKeyToken=B77A5C561934E089"/>
</configSections>
<MicrosoftWebControls> <add key="CommonFiles"
value="/yourwebsitename/webctrl_client/1_0/"/>
</MicrosoftWebControls>

Both component, MultiPage and TabStrip, are only editable from the html view and can not editable from the designer.
Wednesday, February 01, 2006
Designing Distributed System using VS.Net 2005 Team System
The Distributed System Designers are tools that support the graphical design and validation of distributed systems. This toolset includes tools for application architects, designers, developers and operations architects. The Distributed System Designers are an early deliverable from the Dynamic Systems Initiative (DSI), aimed at improving the development, deployment and management of enterprise-class distributed systems.
The Distributed System Designers provide an integrated design experience with the goal of enabling the visual design and validation of distributed systems. Designers use the System Definition Model (SDM) as the underlying meta-model that describes connectivity, configuration and relationships not only for the application services, but also for the run-time environments. SDM is based on a multi-layered model that includes applications, application hosting environments, network topology, operating systems, and physical devices. This model allows the Distributed System Designers to not only describe designs at each layer, but also to express constraints and policies at each layer that can cut across all layers of a distributed system.
The Distributed System Designers support an integrated model of two domains—development and operations. This allows the designers to address customer problems in the following ways:
- Provides a common language (based on SDM) for describing the design and configuration of a distributed system.
- Allows developers to express what the application requires of the run-time environment.
- Allows operations to express application runtime, security, and connectivity requirements that are the policies of the target deployment environment.
- Uses abstractions that allow developers and operations to communicate on common ground.
- Integrates with the existing Visual Studio project system and .NET technologies.
- Provides full synchronization between visual design elements and code.
- Includes an extensibility framework to allow new kinds of application and hosting systems to be modeled.
The following section elaborates on the capabilities of the individual designers and editors in the Distributed System Designers toolset.
The Distributed System Designers include the following designers:
- Application Connection Designer
- Logical Datacenter Designer
- System Designer
- Deployment Designer
We will discuss these designers in the other threads.
Visual Studio 2005 Templates
Visual Studio project and item templates provide reusable and customizable project and item stubs that accelerate the development process, removing the need to create new projects and items from scratch.
A number of predefined project and item templates are installed when you install Visual Studio. For example, the Visual Basic, Visual C#, and Visual J# Windows Appliation and Class Library templates available in the New Project dialog box are all examples project templates. Installed item templates are available from the Add New Item dialog box, and include items such as XML files, HTML pages, and Style Sheets.
These templates provide a starting point for users to begin creating new projects or expanding current projects. Project templates provide the basic files needed for a particular project type, include standard assembly references, and set default project properties and compiler options. Item templates can range in complexity from a single empty file with the correct file extension to a multi-file item containing items such as source code files with stub code, designer information files, and embedded resources.
In addition to the installed templates available in the New Project and Add New Item dialog boxes, you can author your own templates or download and use templates created by the community.
All project and item templates, whether installed with Visual Studio or created by you, function with the same principles and consist of the same contents. All templates contain the following items:
- The files to create when the template is used. This includes all source code files, embedded resources, project files, etc.
- One .vstemplate file. This file contains the metadata that provides Visual Studio with the information it needs to display the template in the New Project and Add New Item dialog boxes and create a project or item from the template.
Tuesday, January 31, 2006
Display a Windows Form without Recreate the Object
This is a simple code to check whether a form is already created or not.
First, if the Form is nothing then we always create the object.
Second, if the form is ever created but already disposed. The objForm contains a reference but the objForm.Created is false. We also create the object.
Otherwise, we only show and activate the form without recreate the object if the form is already created.
Private objForm as myFormName
Private Sub DisplayForm()
If IsNothing(objForm) OrElse Not (objForm.Created) Then
objForm= New myFormName
End If
objForm.Show()
objForm.Activate()
End Sub
Create ASP.Net Page Title in Web Browser
I want to introduce you how to create page Title in your web browser. I create the title first time using Visual Studio .Net 2003.
The steps are described below:
1. Add id and runat server at your asp page.
<title id="PageTitle" runat="server"></title>
2. Add a HtmlGenericControl object in your code-behind.
Protected PageTitle As HtmlGenericControl
3. Set the innertext for the PageTitle object in your code-behind.
PageTitle.InnerText = "This is a new title"
These three steps will set your web browser title to a new title.
Now I migrate my application to Microsoft .Net 2.0.
Using Microsoft .Net 2.0, the steps can be written in one line:
Page.Title = "This is a new title"
The line above is a new feature in Microsoft .Net 2.0. I create my application using Visual Studio .Net 2005. This is only one enhancement in this version.
Saturday, January 28, 2006
New Visual Studio.Net 2005 Application Folders
ASP.NET recognizes certain folder names that you can use for specific types of content. The table below lists the reserved folder names and the type of files that the folders typically contain.
The content of application folders, except for the App_Themes folder, is not served in response to Web requests, but it can be accessed from application code.
1. App_Browsers : Contains browser definitions (.browser files) that ASP.NET uses to identify individual browsers and determine their capabilities.
2. App_Code : Contains source code for utility classes and business objects (for example, .cs, .vb, and .jsl files) that you want to compile as part of your application. In a dynamically compiled application, ASP.NET compiles the code in the App_Code folder on the initial request to your application. Items in this folder are then recompiled when any changes are detected.
3. App_Data : Contains application data files including MDF files, XML files, as well as other data store files. The App_Data folder is used by ASP.NET 2.0 to store an application's local database, which can be used for maintaining membership and role information.
4. App_GlobalResources : Contains resources (.resx and .resources files) that are compiled into assemblies with global scope. Resources in the App_GlobalResources folder are strongly typed and can be accessed programmatically.
5. App_LocalResources : Contains resources (.resx and .resources files) that are associated with a specific page, user control, or master page in an application.
6. App_Themes : Contains a collection of files (.skin and .css files, as well as image files and generic resources) that define the appearance of ASP.NET Web pages and controls.
7. App_WebReferences : Contains reference contract files (.wsdl files), schemas (.xsd files), and discovery document files (.disco and .discomap files) defining a Web reference for use in an application.
8. Bin : Contains compiled assemblies (.dll files) for controls, components, or other code that you want to reference in your application. Any classes represented by code in the Bin folder are automatically referenced in your application.
Configuration settings for your site are managed in a Web.config file that is located in the site's root folder. If you have files in subfolders, you can maintain separate configuration settings for those files by creating a Web.config file in that folder.
Subscribe to:
Posts (Atom)